Let me guess
You offer services or maybe you sell products on your WordPress site
You want to receive PayPal payments
And you want an easy but professional way to go about it
I have a solution for you
You can easily collect your PayPal payments in WordPress using WPForms
WPForms is a contact forms plugin that is used and trusted by millions of WordPress users
And I’m going to show you how you can use it to collect your payments in 5 easy steps
Step 1: Install And Activate WPForms
Some links in this section are affiliate links. I may earn a small commission to buy toys for my kids if you use these links. You will not be charged extra. I only recommend high-quality products and I don’t recommend them based on the small amount I earn if you decide to make a purchase
Before we get to the nitty-gritty of collecting PayPal payments in WordPress
You need to install WPForms and activate it, follow this guide and learn how to install and activate a plugin in WordPress
You will need WPForms pro for you to be able to collect PayPal payments on your site
Get WPForms pro
Step 2: Install The PayPal Addon
Now that you have installed and activated WPForms >> go to your WordPress dashboard and select WPForms
Click Addons and select the PayPal Addon on the Addons page then click install addon
And take the following step once the PayPal addon is activated:
Step 3: Create A Form
WPForms has built-in form templates that you can use on your site for any purpose
You can also create your own form from scratch using the drag and drop form builder
But in this tutorial, we are going to use a Billing/order form template
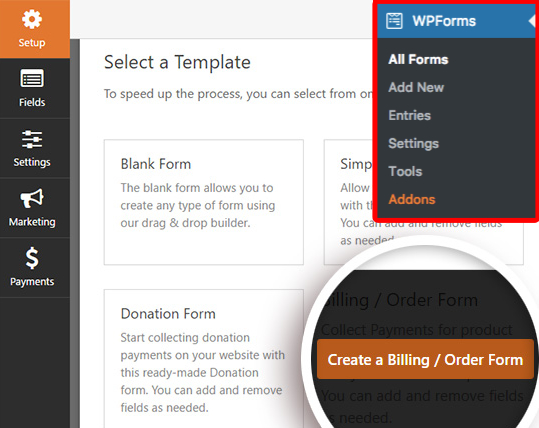
PayPal needs one field for it to work properly which is an items field
It could be a Single item, Checkbox items, Dropdown items or Multiple items field, all up to you
The template comes with other fields that you’d want in a payment form so it’s all up to you to keep all or use less fields
That said, make sure that you don’t add a credit card field because all sensitive details will be filled on PayPal’s site after the form is submitted
Step 4: Add PayPal Payments To Your Forms
Now that your form is created let’s connect it with PayPal
Go to Payments >> PayPal Standard and check the box labelled Enable PayPal Standard payments
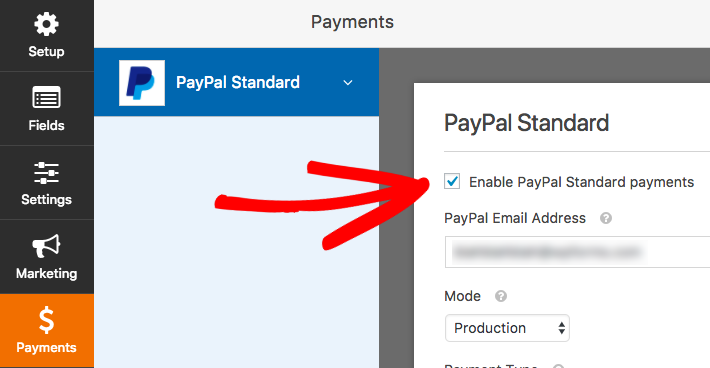
You’ll need to fill out the following PayPal settings:
- PayPal Email Address: The email address used on the PayPal account where payments will be sent
- Mode: Production or Test/Sandbox
- Payment Type: The URL that your customers will be redirected to after completing a payment
- Shipping: ask for the address during PayPal’s checkout process
There are two checkbox options at the bottom of these settings:
- Don’t ask buyer to include a note with payment, check this box if you don’t want customers to add a note in PayPal checkout
- Enable conditional logic, this is useful if you want to let your customers choose between paying with Stripe or PayPal in your form
When you’re done click save to store your payment settings
Step 5: Set Up Conditional Logic For Payments
Note: This step is optional
You can also include the option to set up conditional logic which allows you to create smart forms, automatically changing behaviour or content in the form based on a customer’s selection
You can use conditional logic with PayPal payments to:
- Make payment option
- Let your customers choose to pay with Stripe or PayPal
Now we want to set up conditional logic for PayPal payments
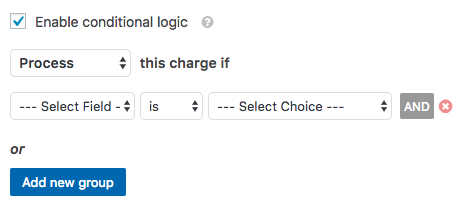
Open the form builder and go to Payments >> PayPal Standard and check the box labelled Enable conditional logic

Once you check the box you will see some additional options
The options will include:
- Select Field: Choose the field where you’d like to apply this rule
- Process: Determine what should happen if the conditions are met
- Is: Choose the type of comparison you’d like to use
- Select Choice: Determine what value you’d like the field to contain in order for this to apply
This allows you to set your rule(s) about when your customer should be sent to PayPal to complete the payment process
That’s it you can now collect PayPal payments in WordPress
Congrats!
I hope this post helped you, please show some love kindly share with your peeps and don’t forget to follow me on Pinterest

Mathea Ford is a blogger, dietitian and mom of 2 just working on this blog to make life a little better for those around me. Check out her latest posts

